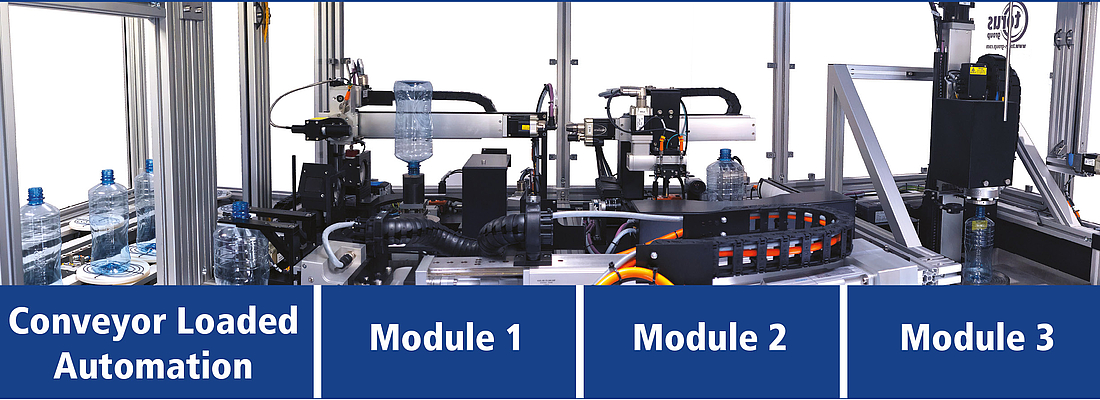
Finding new innovative ways to bring improvements to the quality control aspect of the plastics industry has been Torus Measurement Systems’ focus since launching their first plastic packaging inspection systems in 2013. Whilst visiting customers around the world, it became apparent that there was a noticeable drive for change and improvement in the industry. Torus adopted a fresh approach; combining working closely with customers to identify needs with developing new technologies to offer solutions that solve specific customer problems. Focusing on customer relationships, Torus aim to become a trusted partner rather than simply offering transactional exchange of equipment, creating a collaborative environment benefiting both Torus and their customer partners. This customercentric philosophy together with the technical expertise within the Torus Group has led to their latest development, the TQ-Lab. Historically, bottles and preforms have been collected from production, brought into the laboratory and checked for their conformance. Whilst there are systems used to provide faster or even line speed checks, unfortunately their accuracy is limited. Torus specialise in offering quick and efficient batch testing, where measurements can be taken quickly but do not compromise on the accuracy and reliability of results delivered by laboratory level tests.
The modular approach
The philosophy of modularity has proved to be successful for Torus Group for over 25 years. This approach offers customers the benefit of flexibility to configure measurement and inspection systems based on their requirement. The TQLab provides an enhancement of Torus’ trademark modular approach to plastic packaging quality control. Customers can specify the most critical measurement modules and incorporate their needs into one automated system. This could be used for qualification of new moulds or production of existing containers and preforms. The design of such a system is the first of its kind. Currently this total quality solution is available with up to three modules, including – Thickness, neck and body dimensions, internal diameter and top load & volume capacity. In total, the TQ-Lab can offer more than 40 different measurement features without any interventions from the operator. Developments on the TQ-Lab are moving quickly, after further discussions with customers there are now plans for an extension to include a fourth module for automatic burst testing, illustrating the flexibility of the system and opening other possibilities for the future. Where annual budgets are restricted, blank modules can be included for future upgrades, removing the need to purchase additional systems as requirements change.
Fig 1
The TQ-Lab process The operator loads batches of containers onto a flexible puck system which cycles on a turnaround conveyor, the relevant program is then selected from a single centralised interface. The operator is then able to walk away and allow the TQ-Lab to take care of the rest. Programming time has been reduced to a minimum by use of a custom, neck-find vision system at the pick-up area of the conveyor, see Fig. 2.
The vision system (Fig. 2) locates the neck and passes coordinates to the handling gantry which will automatically drive to the required pickup position. Accurate positioning when loading the containers onto the conveyor is not required, Torus’ own intelligent GaugeXplorer software coupled with a motorised gripper containing force feedback detection locates and identifies the relevant neck position.
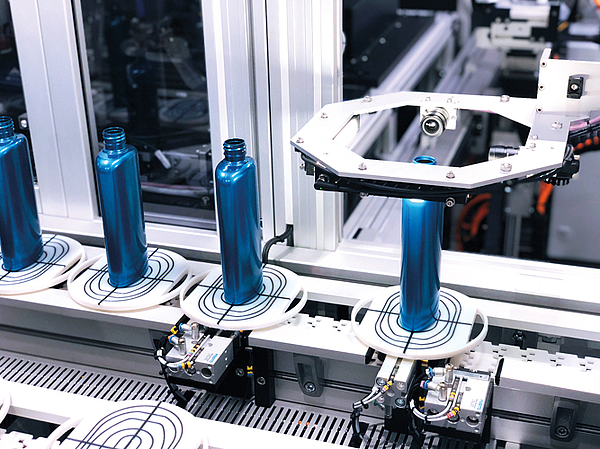
Fig 2: Intelligent neck-find system on the TQ-Lab
The container is picked from the conveyor and loaded neck down into the first module, Torus’ B302 TBT Gauge (Fig. 3), which will carry out wall thickness, base thickness, neck finish, body diameter and perpendicularity measurements.
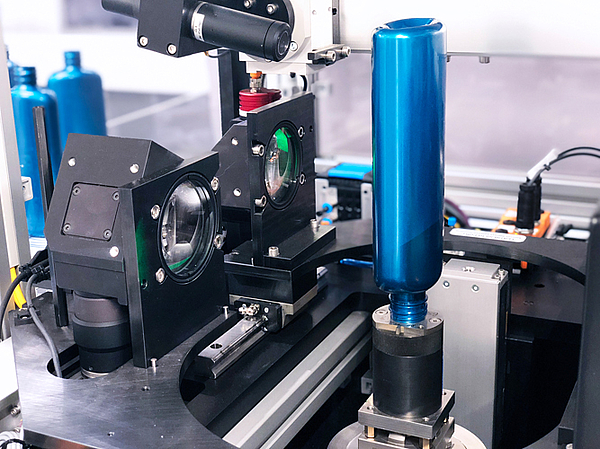
Fig 3: Torus’ B302 Thread, Body & Thickness Gauge
Once complete the handling system transfers the container to the second module, the B309 Internal Diameter Gauge (Fig. 4), measuring internal diameter using a unique white light sensor. A miniature confocal pen takes multiple scans of the neck internal diameter at the specified height. The key to this operation is no touch points; measurements are taken without contact, producing flexibility whilst maintaining world class accuracy and repeatability.
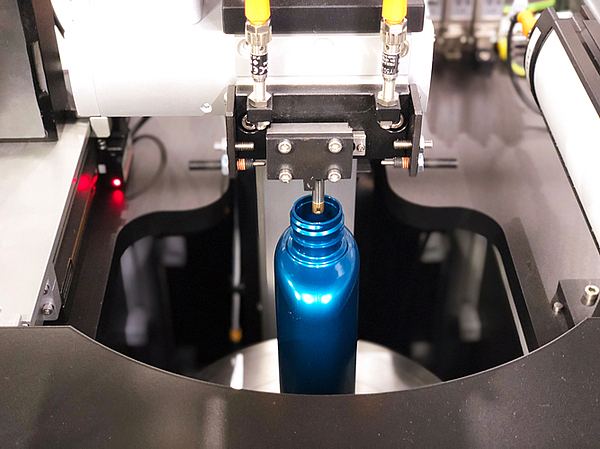
Fig 4: Torus’ B309 Internal Diameter Gauge
A second container transfer process takes place into the final module to measure Top Load & Volume capacity (Fig. 5). The container is then emptied using a vacuum system before being segregated into dedicated pass or fail bins to complete the process. Round, oval, square, filled or empty containers can be handled, with minimal change parts.
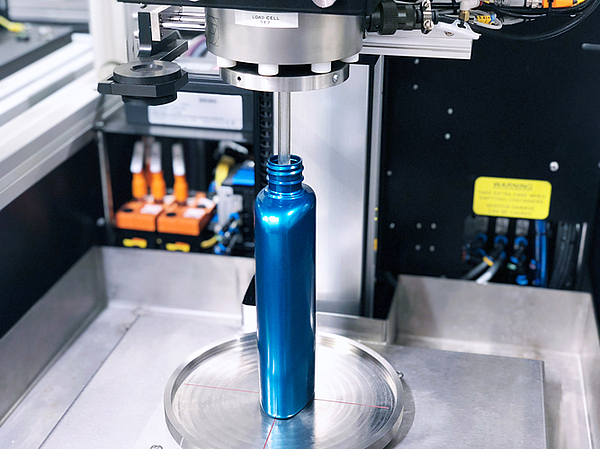
Fig 5: Torus’ B304 Top Load & Volume Gauge
Big data As the big data era emerges, the importance of using advanced analytics in manufacturing is becoming essential to diagnosing and correcting process flaws that are impacting manufacturers’ productivity and efficiency gains. The industry is beginning to recognise that big data analytics are required to compete successfully in our increasingly complex data-driven economy. As a result of this, many manufacturing companies are investing in or planning on investing in systems and practices to collect more data whilst others may invest in systems or skillsets that allow them to optimize their use of existing process information. Analytical Data can then be used to identify improvements in processes, production variables and drive innovation to strengthen competitive advantage.
The TQ-Lab produces large measurement data sets which customers can use to analyse and reveal patterns or trends to make quick decisions relating to the validation of new designs or maintaining production quality. On completion of batch measurements using the TQ-Lab, all data is transferred automatically to the customer network, removing the human aspect from the process. The output type is compatible with Microsoft Excel, Statistical Process Control (Fig. 6) or ERP systems.
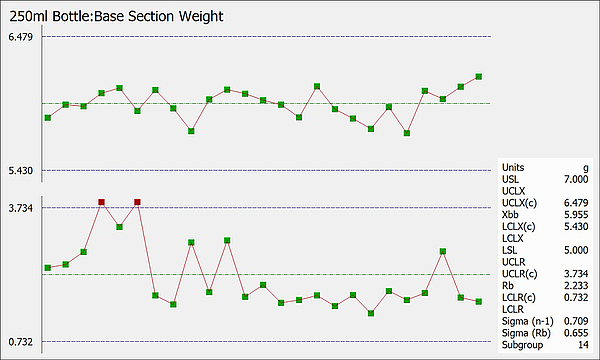
Fig 6: X Bar Chart from Torus’ SPC Xplorer
Software & Support
As the complexity of Torus’ systems increase, Torus must also consider after sales support. Torus are proud of their comprehensive customer support offering and are constantly innovating their services to bring them in line with their innovative products. Remote support has been available for many years, but only now can eyes on support be offered via a new extension of Torus’ traditional GaugeXplorer software, Remote Xplorer (Fig. 7). With the permission of customers, the gauges can now be monitored visually using RemoteXplorer’s newly developed pan and tilt camera system and software package. The new package allows the Torus global support team to view inside of the gauges to identify any possible breakdown issues, causes or solutions. This provides customers with an enhanced level of support reducing reaction times and potential downtime situations.
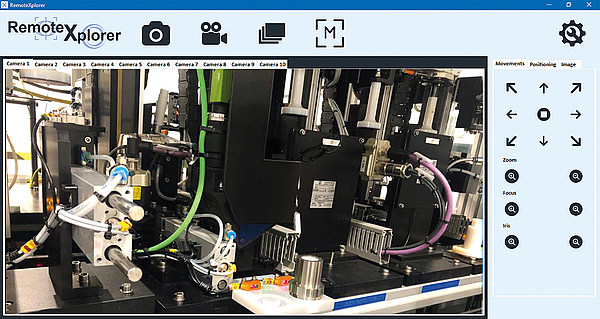
Fig 7: Torus’ new RemoteXplorer software extension
The comPETence center provides your organisation with a dynamic, cost effective way to promote your products and services.

magazine
Find our premium articles, interviews, reports and more
in 3 issues in 2025.


